Sep 1, 2018 - Integrate Stripe easily into your Spring Boot apps

Comments

Stripe is the popular Payment Gateway that allows websites’ owners to make money by accepting payments online. The Stripe API deals with the complicated stuff like Credit Card data, security and PII and offers an API that will allow you, the website owner/developer to deal with the easy stuff.

This easy stuff falls in four categories:

  1. Stuff you do one time during Stripe account setup:
    • Setting up the Project (aka Product). Typically this is one per website.
    • Setting up Payment Plans - How often and how much will your customers pay you.
    • Setting up Coupons - these are discounts/promotions that are set up per plan.
  2. Stuff that needs to happen with every user sign-up, or purchase:
    • Creating a Customer - happens when a user registers on your website.
    • Creating a Subscription - ties a Customer to a Plan.
    • Creating a Transaction - When a charge is made.
  3. Stuff that is done behind the scenes at a pre-configured cadence by Stripe:
    • Prepare Invoices
    • Prepare scheduled reports
  4. Events
    • Provide notifications via callbacks when pre-defined events like charge.succeeded, customer.created etc occur.

When integrating this rich Stripe API with your application, the first question that has to be answered is:

What data should be maintained in the data model of your app, and what data should be maintained in Stripe (in the cloud)?.

The answer to that of course is based on performance, audit and storage constraints. But if addressed purely on the basis of data redundancy, the single link that ties the two models together is the Stripe customerId.

As we can see above, Stripe’s customerId is mapped to the app’s userId (which is the the Id of the User object in the Widget Spring Boot App). Everything else can be retrieved and manipulated via the StripeService by supplying it the customerId. Using the customerId, which would be typically mapped, one-to-one with the UserId, the StripeService can be used to manipulate and access all other entities that are maintained in on Stripe.

In it’s current state (version 1.0.2), StripeService offers limited functionality. For those features not exposed via this service, the base ‘Stripe API` may be accessed. But most commonly used scenarios are described in the readme docs of the service here.

Based on the categories of features offered by Stripe (described above), StripeService offers features in category 2 for now. The other categories represent one-time actions that can be carried out via the Stripe Dashboard.

If your app is built using Spring Boot, incorporating StripeService is even easier via the accompanying Starter project.

Mar 18, 2017 - Beauty in Chaos!

Comments

I recently took a small detour to learing about graph databases. Here are some notes about my findings:

A friend of a friend (Donald), runs a business that sells school books to various schools (both public and charter). Just like any other business, he feels that he can improve his bottom line and reaches out to me, a “Consultant” :) for help

Here are his primary set of questions:

  • How much inventory should I keep?
  • How can I track my sales in all states where I have stores?
  • How can I analyze what books are sold in what markets?
  • When should I use promotions?
  • How can I negotiate my RMAs (Return to Manufacturer Agreements)?

We engage and here is what emerges:

  • BOOKs are published by PUBLISHERs
  • PUBLISHERs have PRINTING_PRESSes
  • PRINTING_PRESSes exist in COUNTRYs
  • BOOKs have a PACKAGING
  • BOOKs have a COLOR
  • Some BOOKS have a SHIPPING_POLICY
  • All BOOKs sold are recorded as a TRANSACTION where attributes of the sale are recorded.

At this time I’m tempted to place this information in a fully normalized RDBMS like MySQL or Oracle.

What would that entail? Perhaps this ERD will be a good indication:
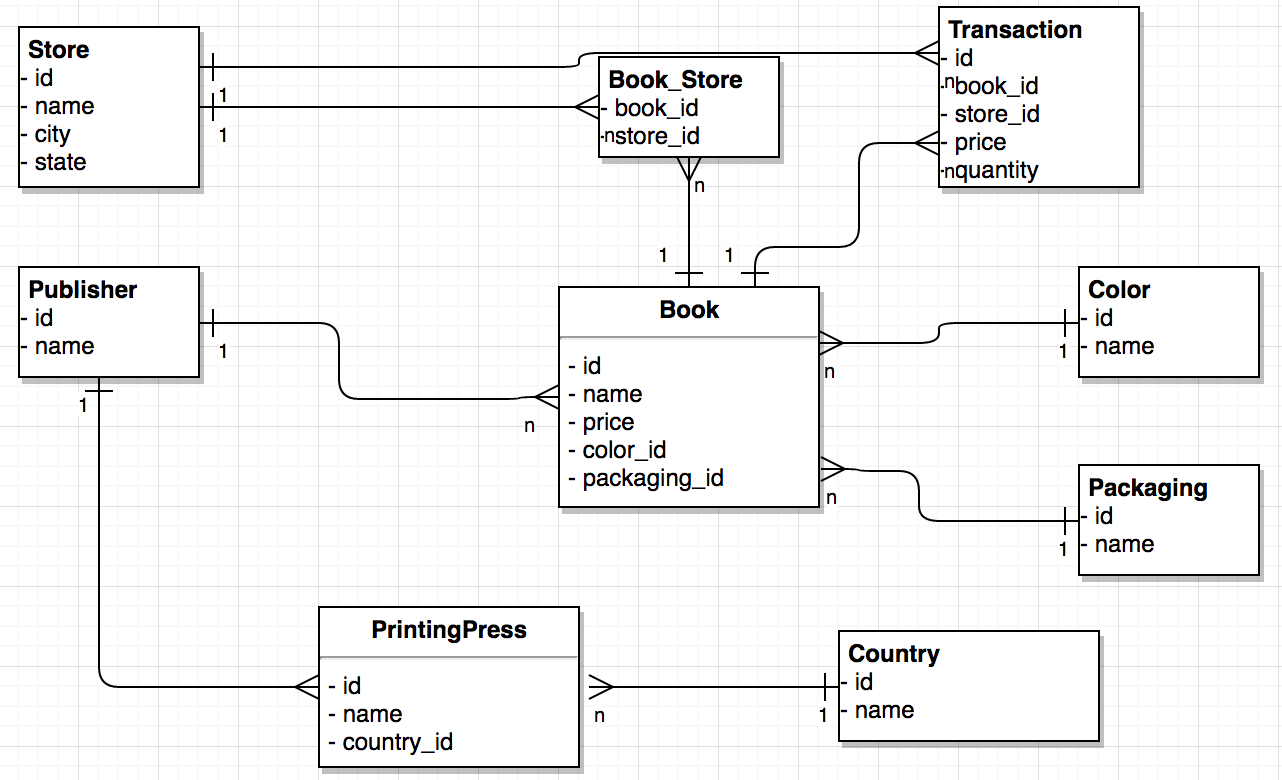
Challenges

However, here are some challenges that we have to solve:

  1. Not all BOOKs have the same attributes. This will cause the BOOK table to be sparsely populated.
  2. Since BOOKs arrive at different STOREs from several PRINTING_PRESSes around the country, the Id’s of these books do not always sync up. So, Harry Potter - The Deathly Hallows sold in Seattle may have a different id that the same book sold in NewYork. Therefore, in the TRANSACTION table, we cannot rely on the fact that the same ID will refer to the same book. This causes reports (that are used by the PUBLISHERs for analysis) built off of the TRANSACTION table, to be messed up.
  3. This equivalence of Ids is different for different PUBLISHERs. For example, some PUBLISHERs consider a blue Harry Potter - Deathly Hallows to be the same as a red book by the same name, but some PUBLISHERs would like them to be treated separately.
  4. As more reading material is published, the attributes that need to be tracked with each BOOK, keep changing.

As we can see, the above challenges can be solved using a RDBMS based storage solution (and have been for years). But in this post, I’d like to suggest how to use a combination of a Graph db and an RDBMS to reduce the pain in addressing these challenges.


A Graph based solution

Approach:

First we will identify fact tables and dimension tables: Based on our model above, it is obvious that the TRANSACTION table is our fact table and all others would be dimension tables.

Then we will store all dimension data in a Graph db and store the transaction data in an RDBMS.

The rationale for this is that dimensions are what Graphs are good at manipulating and maintaining. There is not much churn on fact tables, but their normalized nature tends to make them good candidates for the RDBMS.

Note that dimension tables tend to be smaller than fact tables in most domains. But that has no bearing on the above strategy.

The implementation

We will use Neo4J for our Graph db and MySQL for our RDBMS.

Please download and install neo4j (Should take ~ 5 mins!)

Then experiment with the sample movie db (should take no more than an hour max)

Then, in your browser at localhost:7474, copy and paste this into your command window and execute it.

CREATE (physicsPendulum: Book {id: '001', name: 'Physics Pendulum', price: 15})
CREATE (mathMayhem: Book {id: '002', name: 'Math Mayhem', price: 9})
CREATE (chemistryChaos: Book {id: '003', name: 'Chemistry Chaos', price: 11})
CREATE (trigTurpitude: Book {id: '004', name: 'Trignometry Turpitude', price: 17})

CREATE (theCornerPub: Publisher {id: '005', name: 'The Corner Pub'})
CREATE (theGoodPub: Publisher {id: '006', name: 'The Good Pub'})
CREATE (peteThePublisher: Publisher {id: '007', name: 'Pete the Publisher'})

CREATE (inBlackAndWhite: PrintingPress {id: '008', name: 'In Black And White'})
CREATE (theStencil: PrintingPress {id: '009', name: 'The Stencil'})
CREATE (featherAndInk: PrintingPress {id: '010', name: 'Feather And Ink'})

CREATE (gautemala: Country {id: '011', name: 'Gautemala'})
CREATE (syria: Country {id: '012', name: 'Syria'})

CREATE (red: Color {id: '013', name: 'red'})
CREATE (blue: Color {id: '014', name: 'blue'})
CREATE (green: Color {id: '015', name: 'green'})

CREATE (hardcover: Packaging {id: '016', name: 'Hardcover'})
CREATE (paperback: Packaging {id: '017', name: 'Paperback'})

CREATE (booksNThings: Store {id: '018', name: 'Books and Things', city: 'Pittsburgh', state: 'PA'})
CREATE (bookWorm: Store {id: '019', name: 'Book Worm', city: 'Anahiem', state: 'CA'})
CREATE (nerdCorner: Store {id: '020', name: 'Nerd Corner', city: 'Armadillo', state: 'TX'})


// Relationships
CREATE
   (physicsPendulum)-[:PUBLISHED_BY]->(printedPurgatory),
   (physicsPendulum)-[:REFLECTS]->(red),
   (physicsPendulum)-[:PACKAGED_IN]->(hardcover),
   (mathMayhem)-[:PUBLISHED_BY]->(onlyGoodBooks),
   (mathMayhem)-[:REFLECTS]->(blue),
   (mathMayhem)-[:PACKAGED_IN]->(hardcover),
   (chemistryChaos)-[:PUBLISHED_BY]->(printedPurgatory),
   (chemistryChaos)-[:REFLECTS]->(green),
   (chemistryChaos)-[:PACKAGED_IN]->(paperback),
   (trigTurpitude)-[:PUBLISHED_BY]->(peteThePublisher),
   (trigTurpitude)-[:REFLECTS]->(red),
// Note that the trig book is in both packaging
   (trigTurpitude)-[:PACKAGED_IN]->(hardcover),
   (trigTurpitude)-[:PACKAGED_IN]->(paperback)


CREATE
   (printedPurgatory)-[:PRINTS_AT]->(inBlackAndWhite),
   (onlyGoodBooks)-[:PRINTS_AT]->(theStencil),
   (peteThePublisher)-[:PRINTS_AT]->(featherAndInk)

CREATE
   (inBlackAndWhite)-[:LOCATED_IN]->(gautemala),
   (theStencil)-[:LOCATED_IN]->(gautemala),
   (featherAndInk)-[:LOCATED_IN]->(syria)

CREATE
   (physicsPendulum)-[:SOLD_IN]->(booksNThings),
   (booksNThings)-[:SELLS]->(physicsPendulum),
   (mathMayhem)-[:SOLD_IN]->(bookWorm),
   (bookWorm)-[:SELLS]->(mathMayhem),
   (chemistryChaos)-[:SOLD_IN]->(booksNThings),
   (booksNThings)-[:SELLS]->(chemistryChaos),
   (trigTurpitude)-[:SOLD_IN]->(nerdCorner),
   (nerdCorner)-[:SELLS]->(trigTurpitude)

By doing above we have created the Dimension entities in the Graph Db and also used the data to establish relationship between them.

Let’s query and see what we have got so far:

Run the following to view the schema:

call db.schema;

This yields:

But since we don’t have much data, we can actually pull the entire dataset and view relationships (without blowing up the browser!):
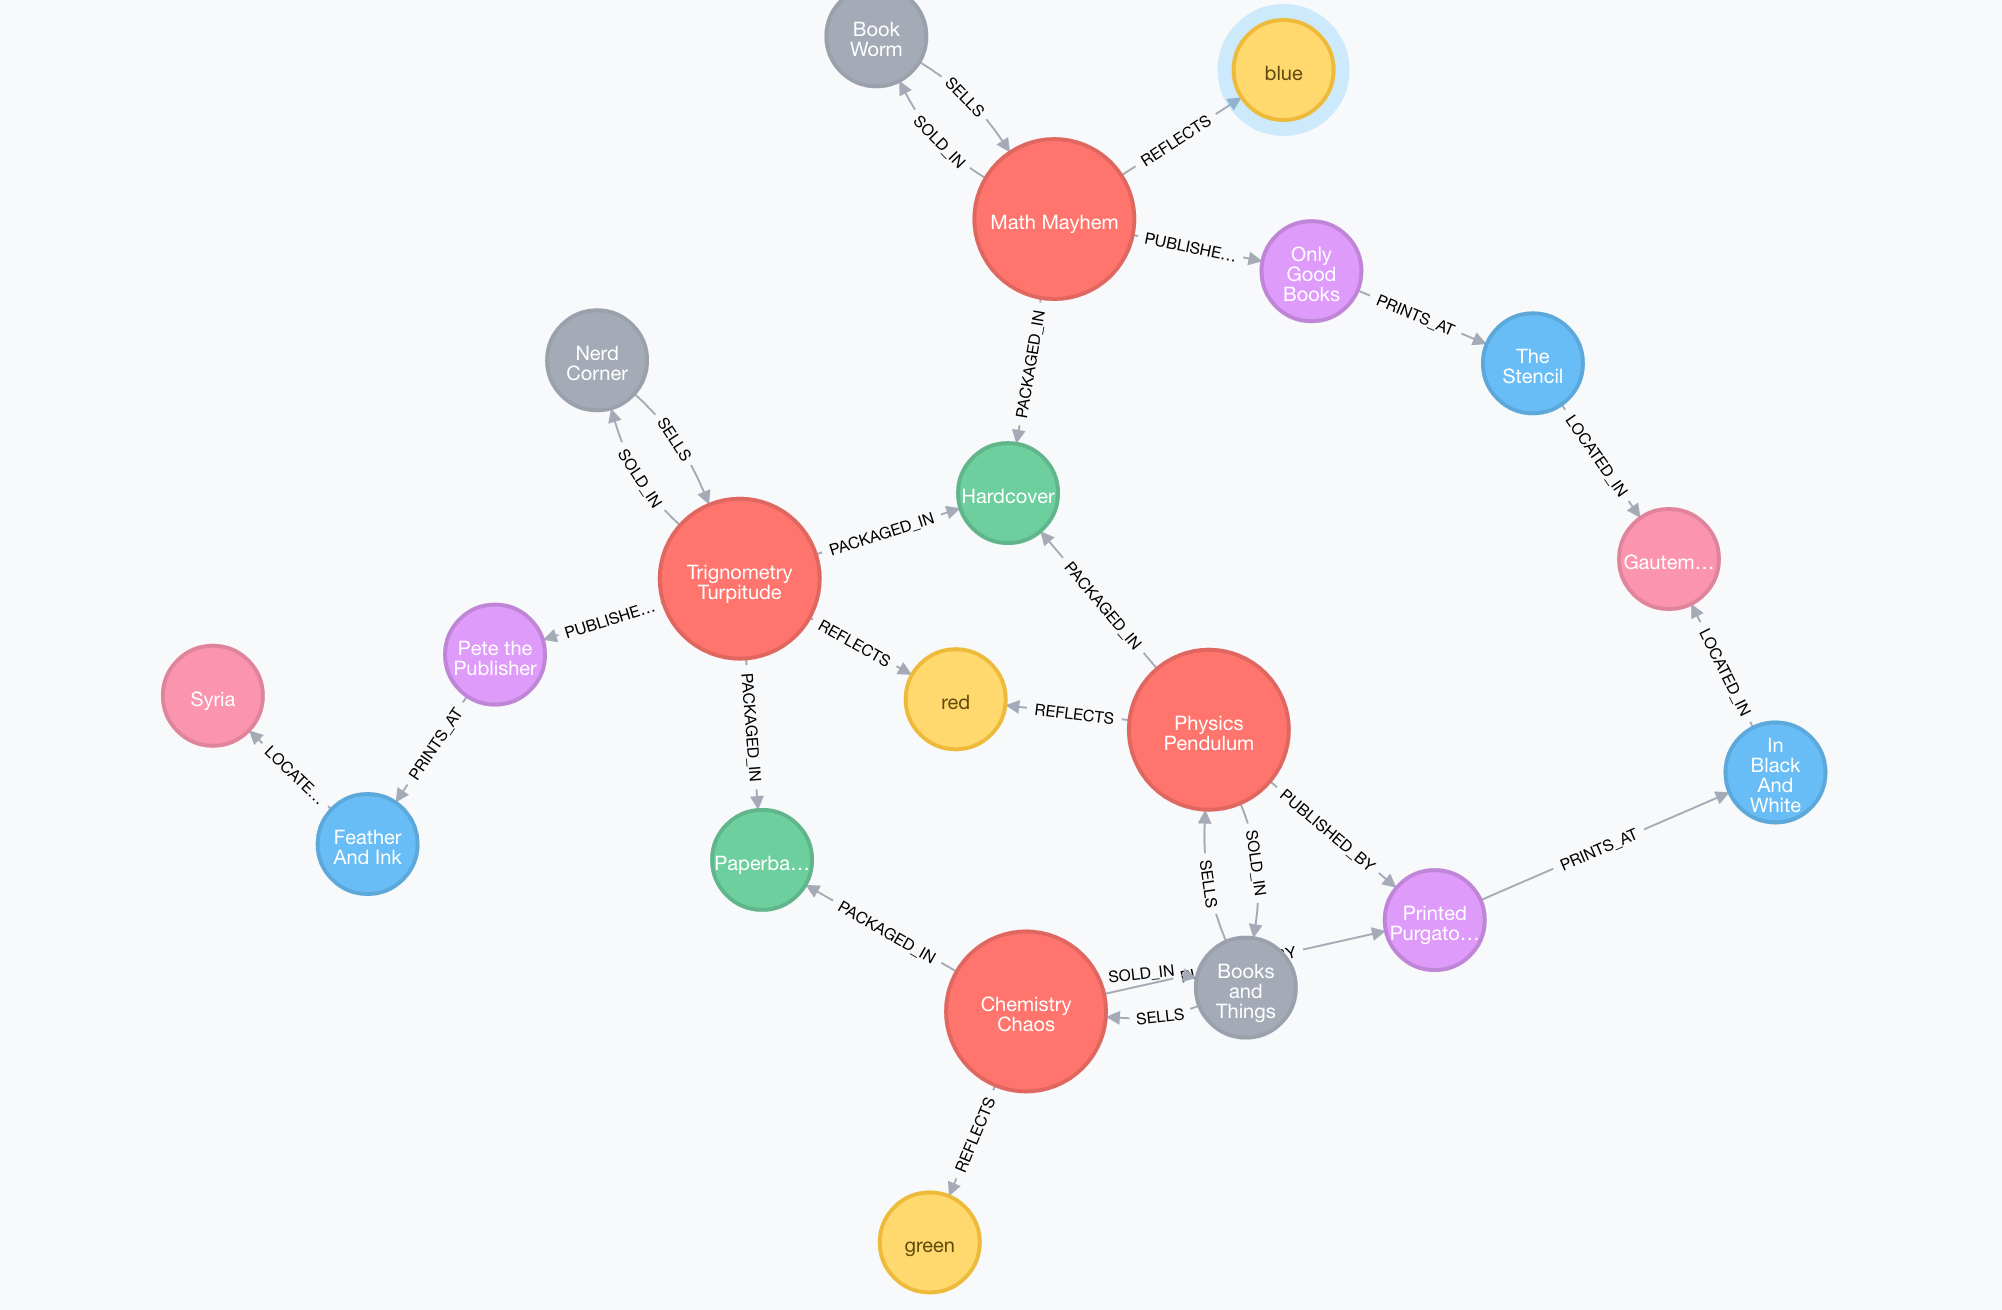
The first thing to notice is that the optional “properties” of color and packaging is handled via a relationship instead of as an inline property of the book (such as is the case with price).

Now let’s create the TRANSACTION table in MySQL.

Please create a database and run the appropriate DDL and INSERT statements to yield the following data in the TRANSACTION table:

id bookId, qty, price, storeId
1  001      2    10.00   020
2  002      3    11.50   030
3  003      4    12.5    040
4  001      3    36.00   030
5  002      4    54.00   040
6  002      1    05.00   020

So now let us address the problem where the blue and red Harry Potter books are the same for PUBLISHER1 but different for PUBLISHER2

For PUBLISHER1 book 001 and book 002 are euivalent For PUBLISHER2 book 002 and 003 are equivalent.

This Cypher statement will establish that equivalence:

MATCH (b:Book {id: '001'})-[*]-(c: Book {id: '002'})
MERGE (b)-[e: EQUIVALENT {publisher: 'PUBLISHER1', equivalentId: '1001'}]->(c)

MATCH (b:Book {id: '002'})-[*]-(c: Book {id: '003'})
MERGE (b)-[e: EQUIVALENT {publisher: 'PUBLISHER2', equivalentId: '1002'}]->(c)

Notice how we have:

  • Created publisher-specific relationships
  • Identified the equivalent id for each pair in the relationship properties and associated it to the relationship.

This yields the following schema:
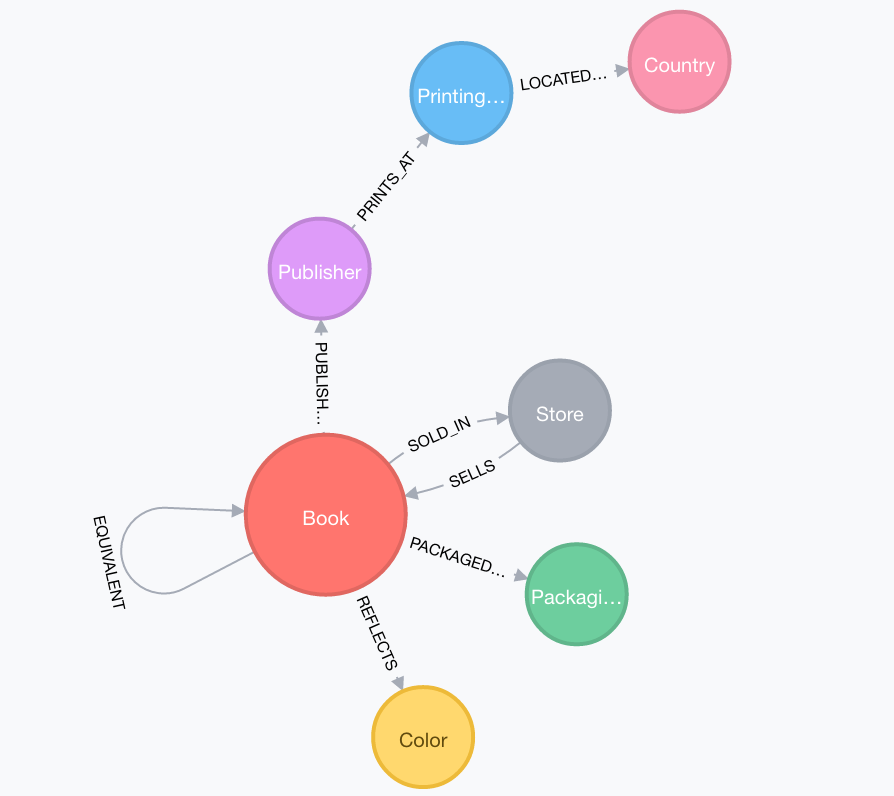
And the same relationship is displayed with the data:
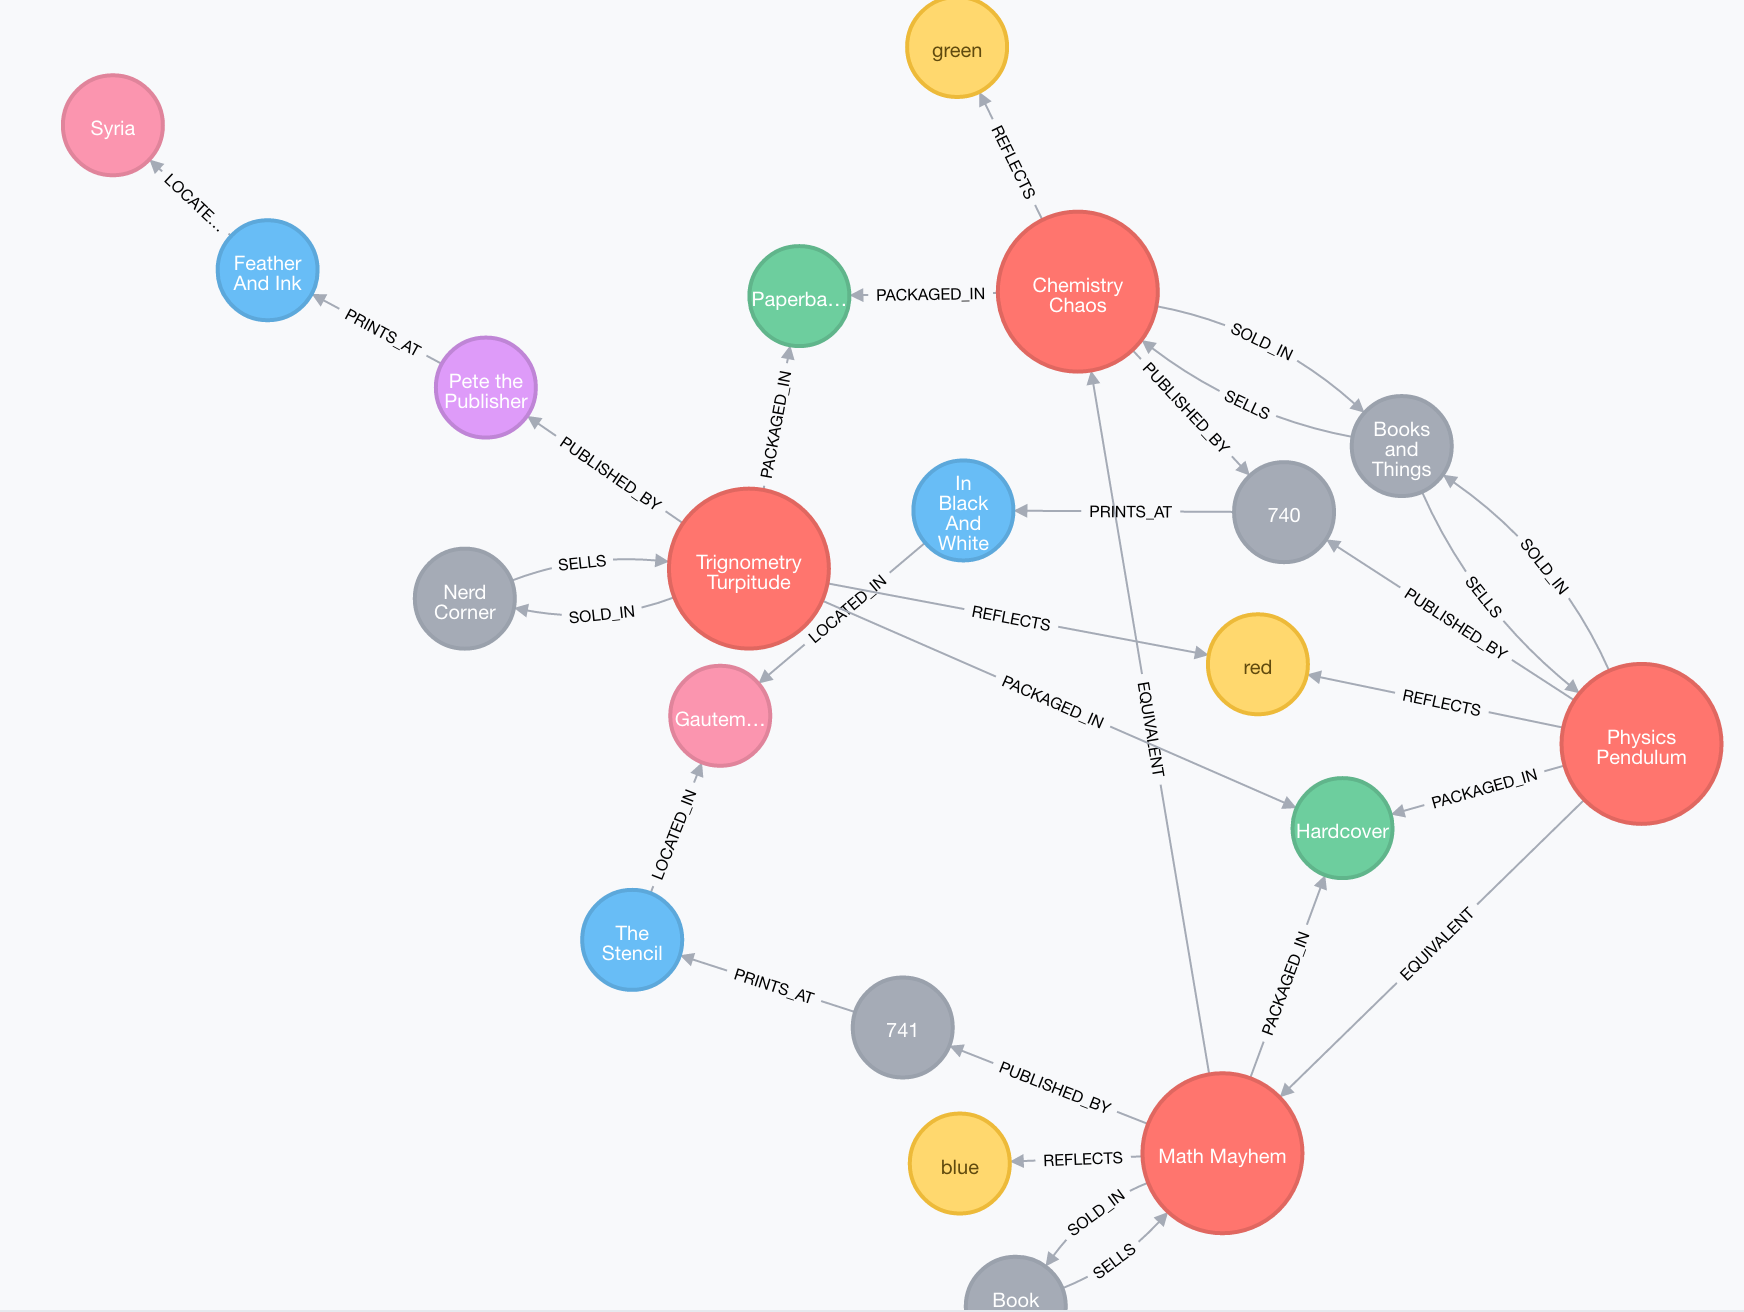
Querying

Now let’s see how we can write queries for the two publishers using this equivalence relationship and the transaction data stored in a relational db.

First pull dimension data using Neo4J for PUBLISHER1.

MATCH (b1: Book)-[r1]-(b2: Book), (b: Book)-[*]-(p)-[*]-(r)-[*]-(c: Country)
WHERE r1.publisher = 'PUBLISHER2'
RETURN DISTINCT b1, b2, r1.equivalentId, b, p, r, c;

Fact data that is stored in MySQL can be accessed in either of two ways:

  • Use the JDBC plugin for Neo4J to make a direct connection .
  • Use the Neo4J API to programatically access data.

Here’s an example of how this model can be queried using plain Cypher querries:

Give me all books that are red in color, printed in Gautemala, sold in PA and cost more than $10.00

MATCH (b:Book)-[:PUBLISHED_BY]->()-[:PRINTS_AT]->()-[:LOCATED_IN]->(c:Country),
(b:Book)-[:REFLECTS]-(r:Color),
(b:Book)-[:SOLD_IN]->(s:Store)
WHERE c.name = 'Gautemala'
AND b.price > 10
AND r.name = 'red'
AND s.state = 'PA'
RETURN b;

CREATE (easyPeasy:ShippingPolicy {id: '021', name: 'The Easy Policy'})
CREATE (hardAsNails:ShippingPolicy {id: '022', name: 'The Hard Policy'})

MATCH (b:Book)-[:PUBLISHED_BY]->()-[:PRINTS_AT]->()-[:LOCATED_IN]->(c:Country)
WHERE c.name = 'Gautemala'
CREATE
  (b)-[:GOVERNED_BY]->(s:ShippingPolicy)

But now delete relationship at schema level

MATCH (a)-[r:GOVERNED_BY]->(b) DELETE r;

And create the same at data level (for specific data that meets a condition):

MATCH (b:Book)-[:PUBLISHED_BY]->()-[:PRINTS_AT]->()-[:LOCATED_IN]->(c:Country)
MATCH (p:ShippingPolicy)
WHERE c.name = 'Gautemala'
AND p.name = 'The Easy Policy'
CREATE
  (b)-[:GOVERNED_BY]->(p)


MATCH (b:Book)-[:PUBLISHED_BY]->()-[:PRINTS_AT]->()-[:LOCATED_IN]->(c:Country)
MATCH (p:ShippingPolicy)
WHERE c.name = 'Syria'
AND p.name = 'The Hard Policy'
CREATE
  (b)-[:GOVERNED_BY]->(p)
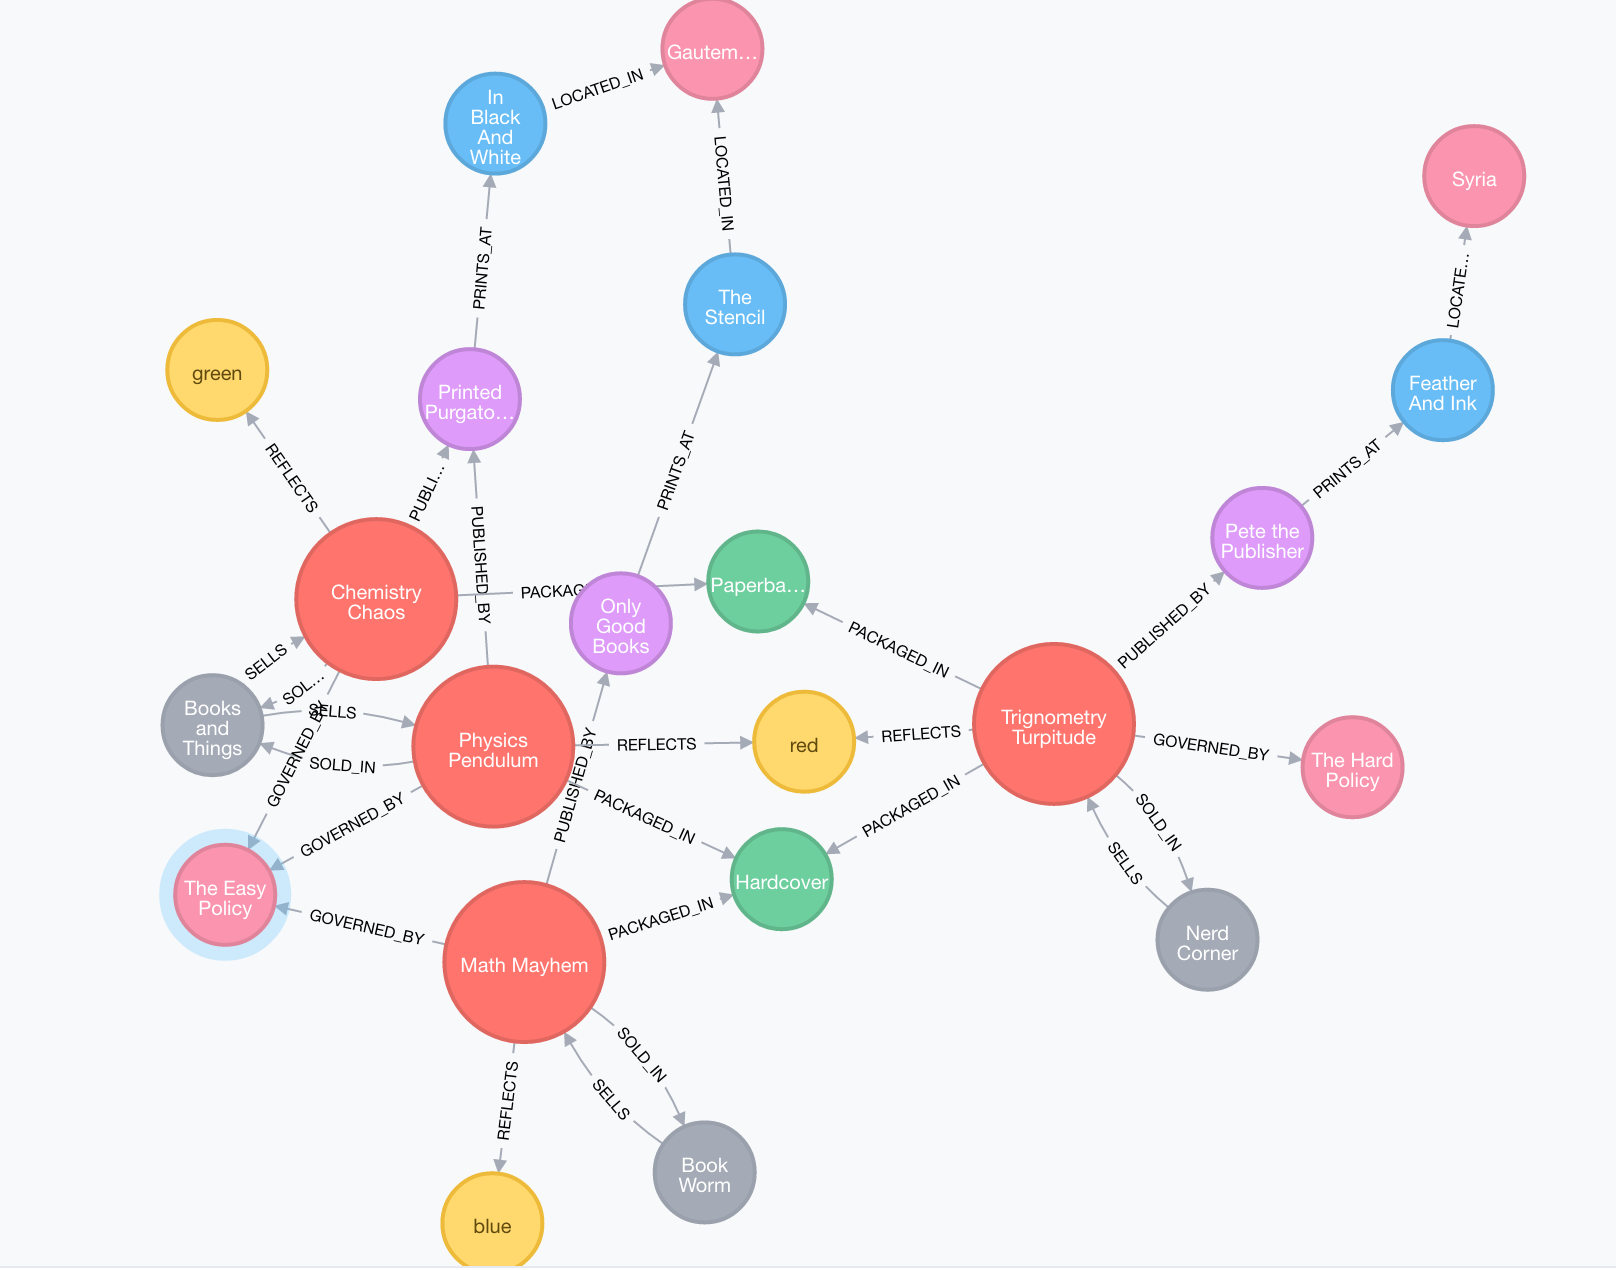
Nov 24, 2016 - Release Management With Git

Comments

Git makes distributed software development easy. Especially Release Management!

Just merge the branch that’s currently being worked on (usually develop) into a release branch (usually master), tag it, and your’e done. The CI tool is configured to pull off the master branch’s tagged commit and there’s your release.

Time passes and you do this again, possibly with the next sprint.

Where it gets a little tedious is when you are asked: What are the new features added in a certain release. Would it not be great if this data was automatically generated without someone having to check the git log or scrutinize the commit graph in SourceTree?

So here’s a neat solution.. With a bit of discipline in your team and the use a nifty maven plugin, you can have release notes generated automatically as a JSON file that can then be (optionally) exposed via a web interface.

First, the rules:

  • You have to be using a Git repository for Source Control.
  • You must be using a standard gitflow. This is one that works well.
  • You must be using Maven for the build of your project
  • You must use the maven-commit-id-plugin

Next, the discipline :

Git is a branch-often-commit-often DVCS. That is a great idea for development; after all, developers may want to reset to a previous commit, try something experimental in a sub-branch or just share a commit with a co-worker.

But these commits are not very meaningful as release notes:

For example:

  • Fixed tests
  • Added exception
  • Refactored code
  • wip :)

.. will not make great release notes!

To address this explosion of commits, there are 2 options:

  1. When code is being submitted for a Pull Request, insist that developers squash commits on the feature branch into one or two meaningful commits that represent the change or feature.
  2. The person who is merging/accepting the Pull Request, either creates another commit that represents the change, or amends an existing commit(s) (on the feature branch), with a token (say the ticket number) in the commit message. This token will tell the maven plugin which commit message to include in the release notes, and which to ignore. With the above in place, the feature branch can be merged into the develop branch.

When the release needs to be cut, the develop branch is merged into master (say) and suitably tagged with a release label like R_1.3.0.

For the next release, the process is repeated and a label like R_1.3.1 is created.

Now, configure your project to use the releaseNotes goal of the maven-git-commit-id plugin. By configuring the plugin to pick up release notes between startTag - R_1.3.1 and endTag - R_1.3.0, we will be able to produce a JSON file with the release notes extracted from the commit messages as described above.

Here is an example:

Given a backlog in your Save The World (STW) project that looks like below:

  • STW-101: Plant some trees
  • STW-102: Feed the hungry
  • STW-103: Save the whales
  • STW-104: Bike to work
  • STW-105: Eat some veggies
  • STW-107: Meditate and cogitate
  • STW-108: Gaze at the night sky
  • STW-109: Do 21 days of Yoga
  • STW-110: Express my gratitude
  • STW-113: Write a helpful blogpost
  • STW-114: Contribute to the open source community
  • STW-115: Dream more
  • STW-116: Eat less
  • STW-117: Worry less
  • STW-118: Plan less

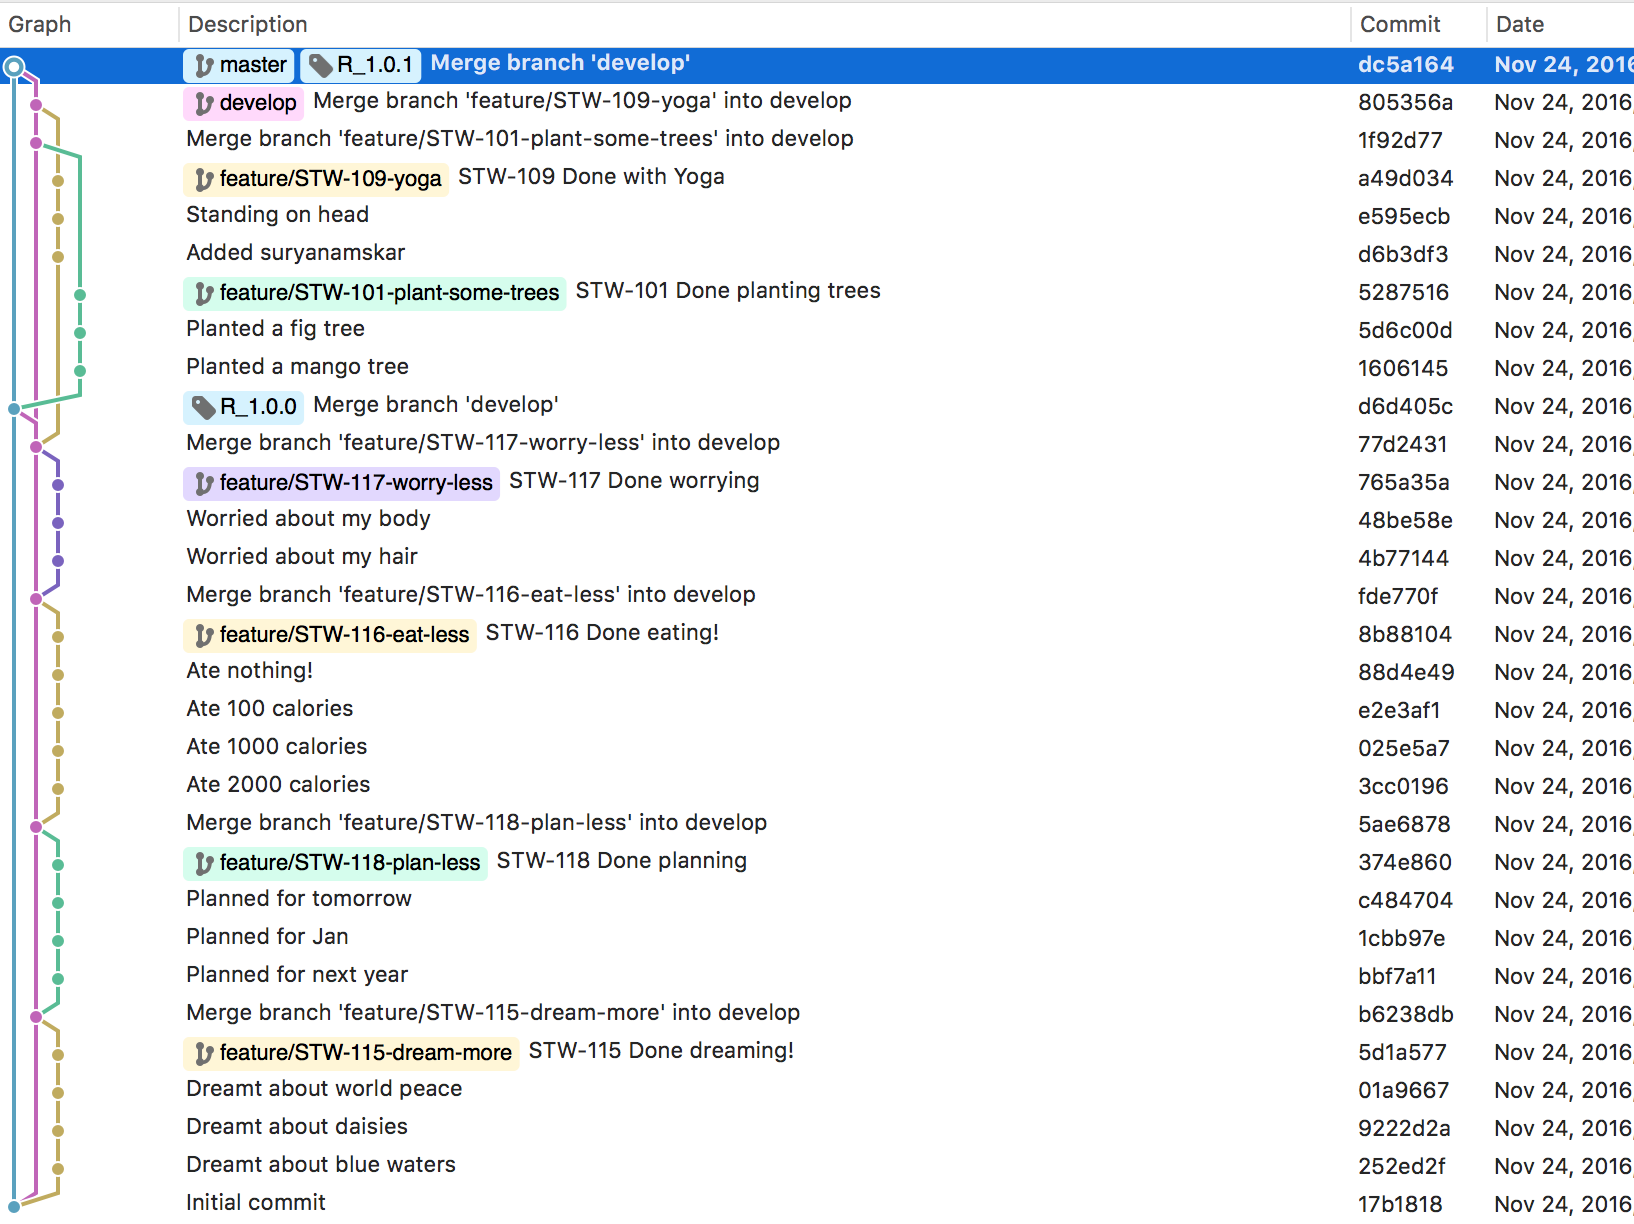
When the developers have done some work, here is what the commit graph may end up looking like:

And your project pom is configured like so:

...
<plugin>
    <groupId>pl.project13.maven</groupId>
    <artifactId>git-commit-id-plugin</artifactId>
    <version>2.2.2-SNAPSHOT</version>
    <executions>
        <execution>
            <id>releaseNotes</id>
            <goals>
                <goal>releaseNotes</goal>
            </goals>
        </execution>
    </executions>
    <configuration>
        <!-- required: Base .git dir -->
        <dotGitDirectory>${project.basedir}/.git</dotGitDirectory>
        
        <!-- required: Tells the plugin where to start generation from -->
        <startTag>R_1.0.1</startTag> 
        
        <!-- optional: Only pick matching tags, else all are picked -->
        <tagNameRegex>R_[0-9].[0-9].[0-9].*</tagNameRegex> 
        
        <!-- optional: Only pick matching commits, else all are picked -->
        <commitMessageRegex>STW-[0-9][0-9][0-9]</commitMessageRegex>
         
        <!-- optional: where to place the generated JSON file. Default is target -->  
        <releaseNotesFileName>${project.basedir}/src/main/webapps/rel-notes.json</releaseNotesFileName>
    </configuration>
</plugin>
 ...           

Then the above commit graph will produce a JSON file like below:

{  
   "generationTime":"2016/11/24 18:15:54 EST",
   "startTag":"R_1.0.1",
   "endTag":null,
   "commitMessageRegex":"STW-[0-9][0-9][0-9]",
   "tagNameRegex":"R_[0-9].[0-9].[0-9].*",
   "tagList":[  
      {  
         "name":"refs/tags/R_1.0.1",
         "featureList":[  
            {  
               "description":"STW-109 Done with Yoga\n",
               "commitHashShort":"a49d034",
               "commitHashLong":"a49d034adbc0f8d517d7841853bd691cc616dc08",
               "author":"Ben Rothlisberger",
               "commitTime":"2016/11/24 18:06:43 EST"
            },
            {  
               "description":"STW-101 Done planting trees\n",
               "commitHashShort":"5287516",
               "commitHashLong":"528751680aea6685eb56b083c232da72c3870291",
               "author":"Antonio Brown",
               "commitTime":"2016/11/24 18:06:37 EST"
            }
         ]
      },
      {  
         "name":"refs/tags/R_1.0.0",
         "featureList":[  
            {  
               "description":"STW-117 Done worrying\n",
               "commitHashShort":"765a35a",
               "commitHashLong":"765a35a91aa9bc558b77e5de1c78f00a487b4ca4",
               "author":"Hines Ward",
               "commitTime":"2016/11/24 18:06:31 EST"
            },
            {  
               "description":"STW-116 Done eating!\n",
               "commitHashShort":"8b88104",
               "commitHashLong":"8b88104c22415acdcd57c802c09c1894848f4618",
               "author":"Hines Ward",
               "commitTime":"2016/11/24 18:06:26 EST"
            },
            {  
               "description":"STW-118 Done planning\n",
               "commitHashShort":"374e860",
               "commitHashLong":"374e860ed6fae44e7f16ace28e529cc243db8e02",
               "author":"Antonio Brown",
               "commitTime":"2016/11/24 18:06:21 EST"
            },
            {  
               "description":"STW-115 Done dreaming!\n",
               "commitHashShort":"5d1a577",
               "commitHashLong":"5d1a577b212e0eae75b01aca70a606874b439a0a",
               "author":"Leveon Bell",
               "commitTime":"2016/11/24 18:05:59 EST"
            }
         ]
      }
   ]
}

Notice that the release notes have picked up only those commit messages that match the commit message regular expression (STW-[0-9][0-9][0-9]). Also, the commit’s are nicely separated by release tags, so your users can not only see the most recent releases but also the earlier ones.

And now, all that’s left to do is expose this JSON in your UI!